
System Upgrade Guide — Debian 11 to 12 v7.0.20
A screen-by-screen walk through the out-of-band assistant that moves the appliance from Debian 11 to Debian 12 — what each stage does, where the point of no return sits, and how to back out cleanly before it.
Netmon updates its own software automatically while your appliance is licensed, without taking the box offline. The one update it cannot apply on its own is a change to the operating system underneath it — moving the appliance from Debian 11 (“bullseye”) to Debian 12 (“bookworm”). That is a larger, more invasive operation, so Netmon hands it to a dedicated, out-of-band System Upgrade assistant that you start from the web interface and then drive yourself.
What the upgrade does
In one sitting, the assistant:
- Upgrades the OS, Debian 11 → 12 — keeping the appliance on supported, security-patched packages.
- Migrates the database, PostgreSQL 13 → 15 — the version that ships with Debian 12. Your old database cluster is kept on the side as a fallback until you choose to remove it.
- Moves the rest of the stack — PHP 7.4 → 8.2 and the other system packages Netmon depends on — to their Debian 12 versions.
Your devices, history, dashboards, alerts, and settings all carry across unchanged.
| Before | After | |
|---|---|---|
| Operating system | Debian 11 (bullseye) | Debian 12 (bookworm) |
| Database | PostgreSQL 13 | PostgreSQL 15 |
| Your data & settings | — | Preserved and migrated |
The upgrade at a glance
The upgrade runs in two stages with one decision point between them. The assistant does the work and advances on its own — including across both reboots — and stops for you only at the checkpoint and at the end.
| Stage | You do | The assistant does | Backing out |
|---|---|---|---|
| Prepare | Copy the token, open the assistant | Starts the out-of-band service | Clean |
| Sign in | Paste token, pick package source, Begin | — | Clean |
| First stage | Wait | Checks, safety snapshot, updates Debian 11, reboots | Clean |
| Checkpoint | Proceed — or Stop and restore | Waits for your decision | Last clean exit |
| Second stage | Wait | Moves to Debian 12, migrates the database, reboots, restarts Netmon | Forward-only |
| Finish | Verify Netmon; optionally reclaim old database | — | — |
Everything up to and including the checkpoint is reversible — nothing destructive has happened, and Stop and restore puts the appliance back on Debian 11 exactly as it was. Past the checkpoint the move is forward-only, which is why you take a backup first.
Plan on up to an hour, longer for a large database, and stay near the browser for the two points where the assistant waits for you.
Netmon stops collecting data when the upgrade begins and resumes when it completes, so run it in a maintenance window. The gap in graphs and logs is expected and fills back in afterward; the history you already collected is preserved.
Before you begin
This is an operating-system change, so it is worth a few minutes of preparation. Run through this checklist before you start.
Confirm the appliance is on Debian 11
This upgrade only applies to appliances still running Debian 11 (bullseye). You can confirm the current release from System → System Settings, in the System Upgrade card — it shows the Debian release plainly. If it already reads bookworm, the appliance is on Debian 12 and there is nothing to do; the card will tell you so.
Take a fresh backup and keep your decryption key
A current backup is your safety net. Past the checkpoint described later in this guide, the upgrade does not roll back on its own, so the surest way to return to a known-good state is to restore from a backup you took just beforehand.
- Open System → System Settings and find the Backup card.
- Click Create Backup and let it finish.
- Make sure you also have the appliance’s private decryption key, which is downloaded once during first-time setup. A backup cannot be restored without it.
The assistant adds a second layer on its own: at the very start of the upgrade it takes an automatic, database-only safety snapshot, and it keeps your old PostgreSQL 13 data on the side until you explicitly remove it. Your own backup remains the complete fallback, which is why it is worth taking one first.
The same out-of-band assistant that performs this upgrade also performs restores. If you ever need to roll back, you return to it and choose Restore Backup instead of OS Upgrade. Restoring is covered in the Product Guide under Data Maintenance.
Set aside a maintenance window
Because monitoring pauses during the upgrade, schedule it for a quiet period. Plan for up to an hour and stay near the browser — the assistant runs unattended between steps, but it waits for you at the checkpoint and at the finish.
What you will need open
- The Netmon web interface, signed in as an administrator (the System Upgrade controls require the Super Admin permission).
- A browser tab you can leave open on the assistant for the duration.
With that in place, you are ready to start the assistant.
Step 1: Start the upgrade assistant
Everything begins from the System Upgrade card in the Netmon web interface. Open System → System Settings and scroll to it.
Find the card
The card shows the appliance’s current state: which Debian release it is on, the installed Netmon version, the PostgreSQL cluster, and whether the upgrade assistant is running. On a Debian 11 appliance that is ready to upgrade, you will see a Prepare OS upgrade button.
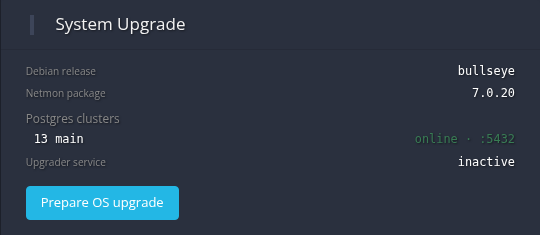
If the button is replaced by an Install OOB Upgrader button, the assistant ships with your release but has not been installed yet. Click it once; it installs in place and the card refreshes to the state above. (On a brand-new install the assistant may not be bundled at all, in which case the card says so — contact Netmon support and we will get it to you.)
Prepare the upgrade and copy the token
Click Prepare OS upgrade. This starts the assistant as a separate, out-of-band service and hands back a one-time access token.
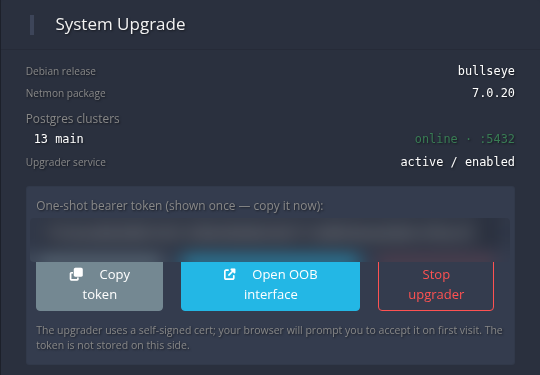
Two things to do here, in order:
- Copy the token. It is shown only once. Click Copy token (or select and copy it by hand). You will paste it into the assistant in a moment.
- Open the assistant. Click Open OOB interface. The assistant runs on its own secured port, separate from the main web interface, so it stays reachable even while Netmon itself is stopped during the upgrade.
The assistant presents its own self-signed certificate, so your browser will ask you to confirm before continuing the first time you open it. This is expected. Accept it and proceed. The token is never stored on the Netmon side — if you lose it before signing in, stop and re-prepare to mint a fresh one.
With the token copied and the assistant open in a new tab, continue to the next step to sign in.
Step 2: Sign in and begin
The upgrade assistant opens to a sign-in screen.
Sign in with the token
Paste the one-time token you just copied into the Bootstrap token field and click Sign in.
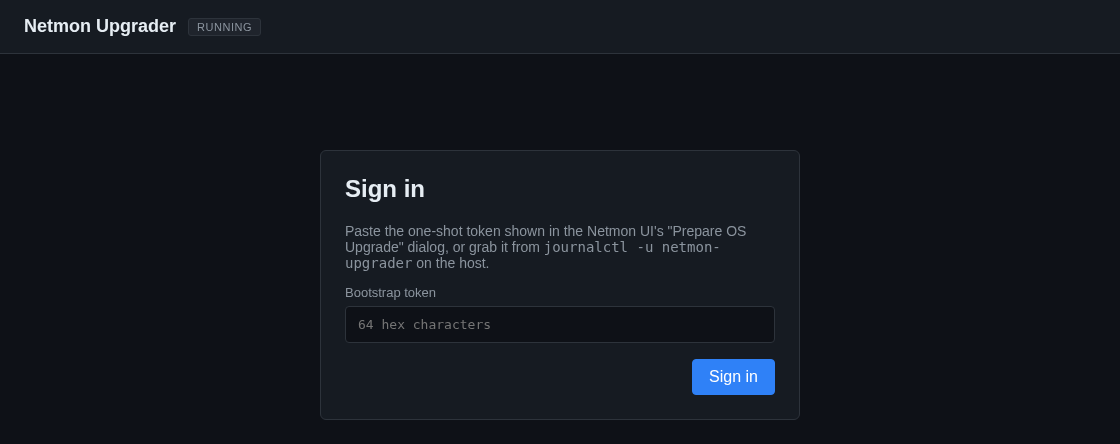
If you ever need the token again and did not keep it, you can read it from the appliance console with journalctl -u netmon-upgrader — but the simplest path is to return to the Netmon card and prepare again.
The assistant home screen
Once signed in, the assistant shows two cards: OS Upgrade and Restore Backup. A status line beneath them reports the current state, which reads idle before you start anything.
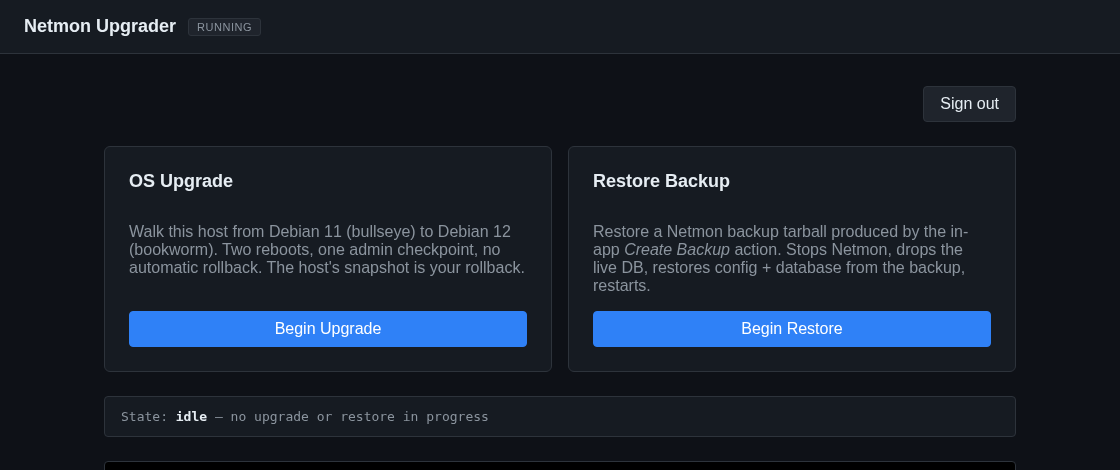
Click Begin Upgrade under OS Upgrade. (The Restore Backup card is the same assistant’s recovery path, covered briefly in the last section and in the Product Guide.)
Choose where the new package comes from
Before the upgrade starts, the assistant asks where it should get the Debian 12 (“bookworm”) build of Netmon during the second stage.
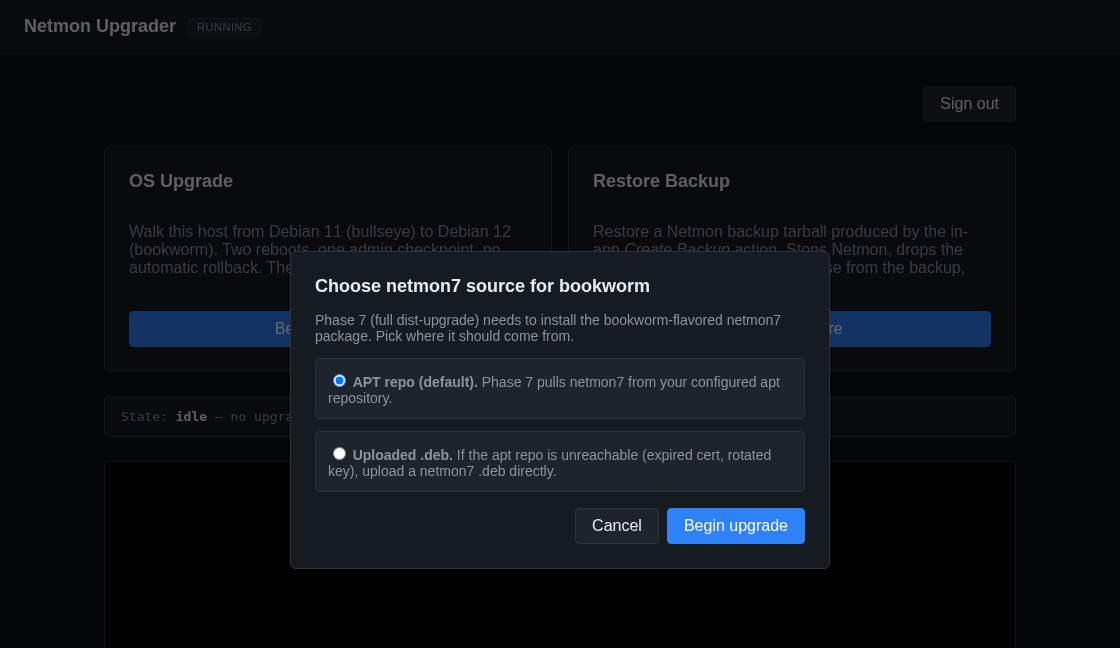
- APT repo (default). Leave this selected. The assistant pulls the new Netmon package from Netmon’s package repository over the network. This is the right choice for almost every appliance.
- Uploaded .deb. Only needed if the appliance cannot reach the package repository — for example on a strictly air-gapped network. If you choose this, you upload the matching Netmon package file yourself.
Click Begin upgrade. The assistant confirms once more that you want to start — it reminds you that the appliance will reboot after the first stage — and then begins.
Step 3: First stage and the checkpoint
The assistant now works through the first, reversible half of the upgrade on its own. You do not need to do anything during this part except keep the page open.
Watch the first stage
The screen switches to a progress view with a live log. The status line names the stage the assistant is currently on, and the log scrolls as each step completes.
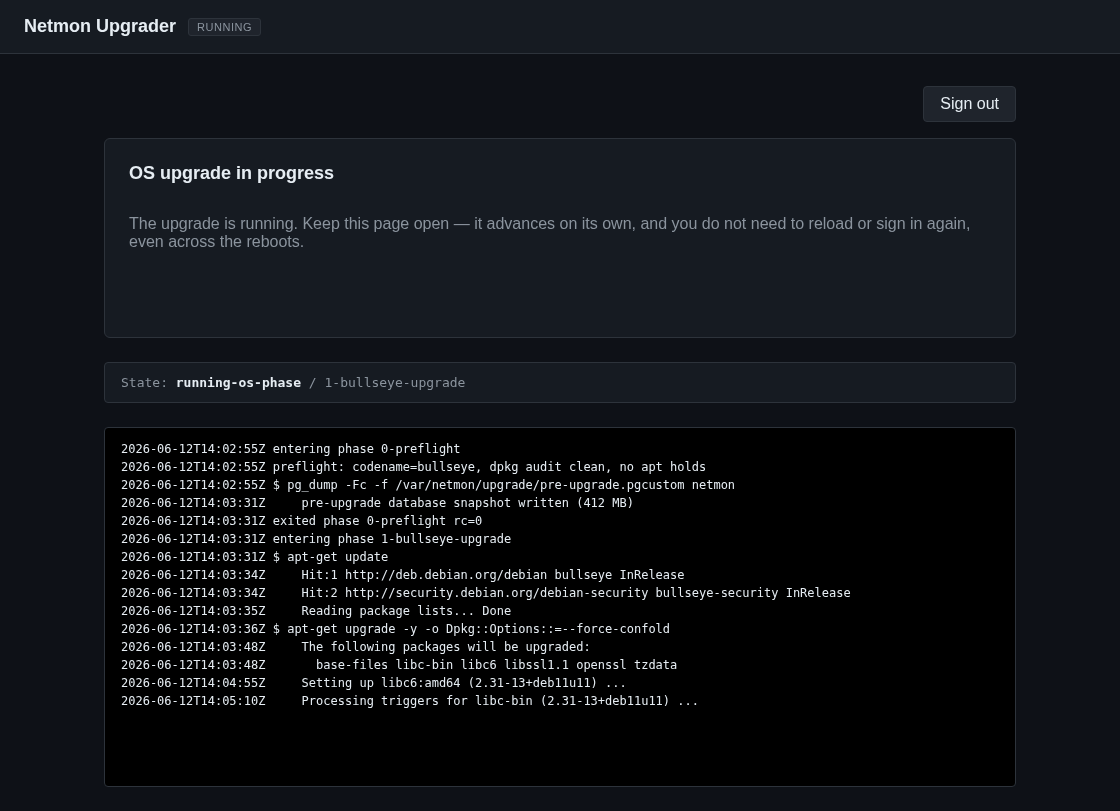
During this stage the assistant:
- runs its pre-flight checks (confirms the appliance really is on Debian 11, that there is enough disk space, and that the package system is healthy);
- takes the automatic database safety snapshot;
- updates the existing Debian 11 packages; and
- reboots the appliance.
When the appliance reboots, this page will briefly lose its connection and then reconnect on its own — you do not need to reload it or sign in again. Leave the tab open and let it come back.
Is this normal?
A system upgrade in progress can look alarming if you have not watched one before. Two things are worth knowing so you can tell ordinary work from a real problem:
- A scrolling log of package activity is exactly what you should see. Lines about fetching, unpacking, and configuring packages — including the occasional warning — are routine for an apt upgrade, not errors.
- Quiet stretches are fine. Some steps work for a while with little on screen. (The database migration in the second stage is the longest single step; a pause there is expected, not a hang.)
There is only one thing to act on: if a step actually fails, the assistant stops and switches to a failure screen — it does not quietly leave the box in a broken state. So as long as you are seeing progress, a normal reboot gap, or a working step, let it run. The failure screen and what to do about it are covered in the last section.
The admin checkpoint
After the first reboot, the assistant stops and waits for you at the admin checkpoint. This is the single most important screen in the upgrade.
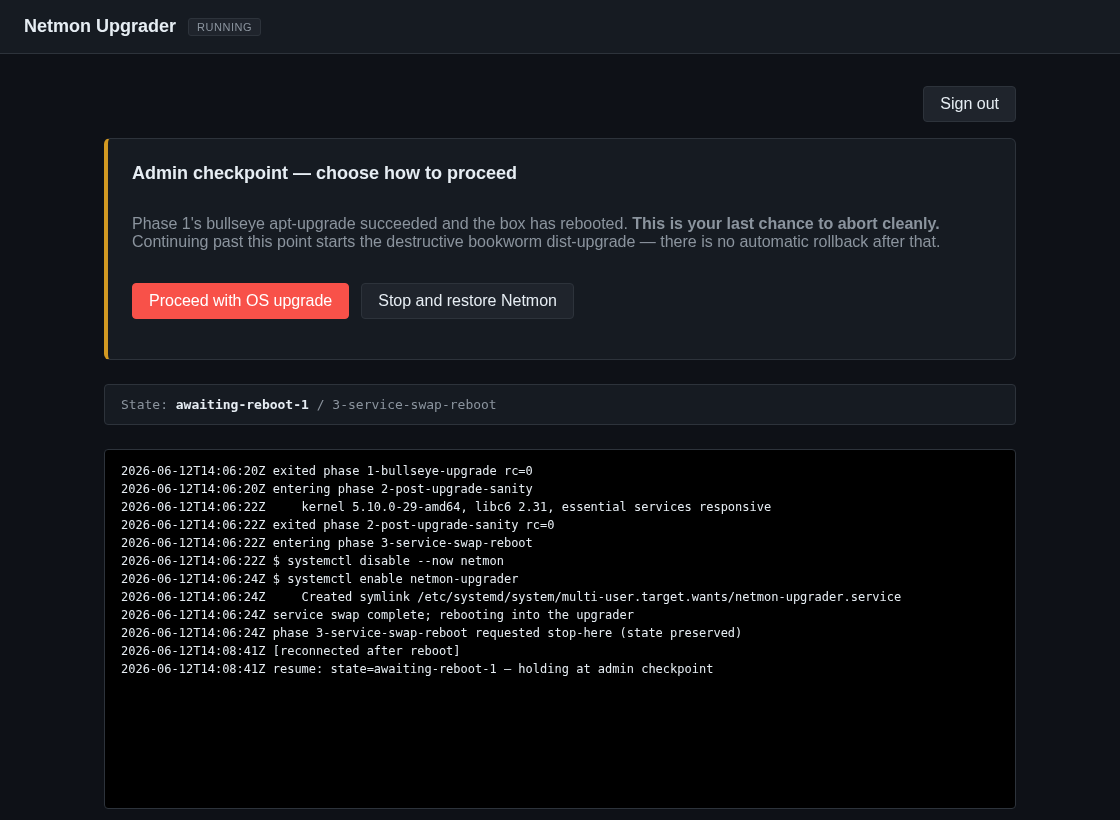
Everything done so far is reversible. The destructive move to Debian 12 has not started yet. You have two choices:
- Proceed with OS upgrade. Continue into the second stage. From here on, the upgrade is forward-only — there is no automatic rollback once the Debian 12 dist-upgrade begins.
- Stop and restore Netmon. Back out cleanly. The assistant undoes the first stage’s preparation and brings Netmon back up on Debian 11, exactly as it was before you started.
This is your last clean exit. Before you click Proceed, make sure your backup from Before you begin completed and that you are inside your maintenance window. If anything looks wrong — unexpected errors in the log, or you simply want to reschedule — choose Stop and restore Netmon and run the upgrade another time.
When you are ready, click Proceed with OS upgrade and confirm. The assistant moves into the second stage.
Step 4: Finish the upgrade
After you proceed, the assistant performs the actual move to Debian 12. This second stage is hands-off: it switches the appliance to the Debian 12 package sources, upgrades the full system, migrates the database from PostgreSQL 13 to 15, reboots a second time, and restarts Netmon.
As before, keep the page open. It reconnects itself across the second reboot and continues without you. The status line tracks the work — the database migration is the longest single step, so a quiet stretch there is normal.
Upgrade complete
When the second stage finishes, the assistant shows the completion screen.
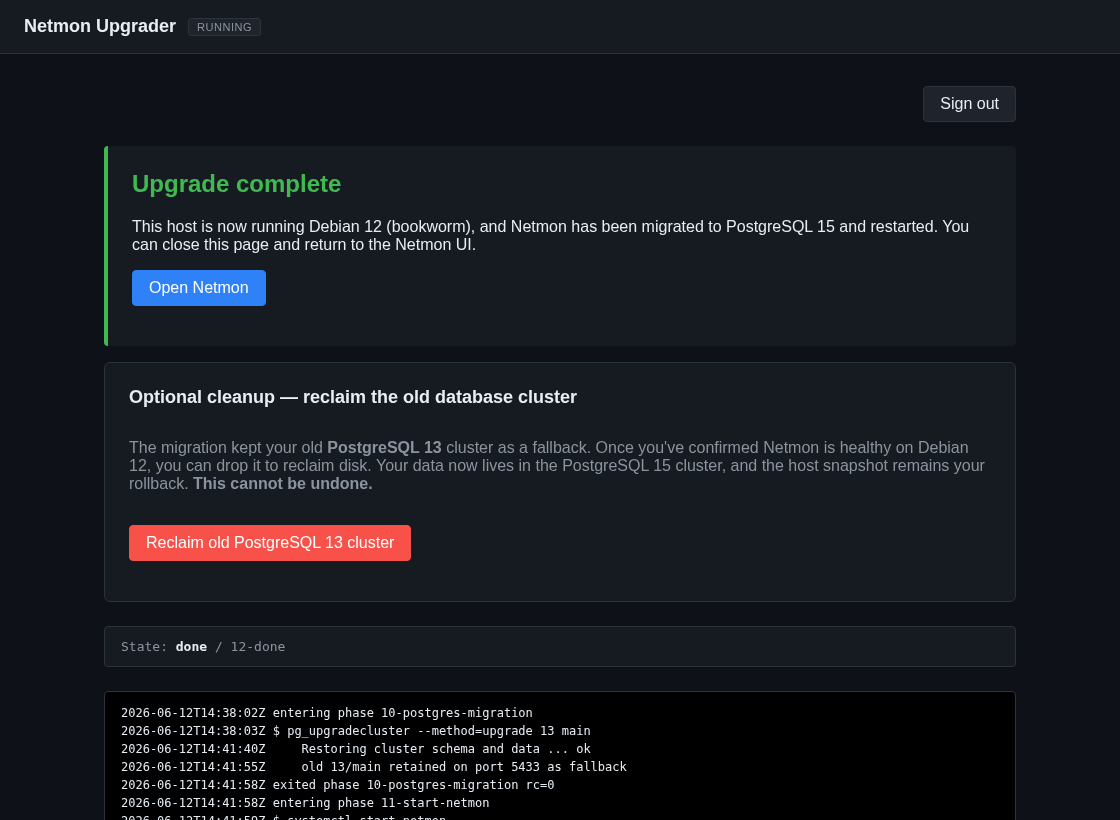
The appliance is now running Debian 12, Netmon has been migrated onto PostgreSQL 15, and monitoring has resumed.
Confirm Netmon is healthy
Click Open Netmon, sign in, and check a few things before you consider the upgrade done:
- Devices are reporting. Open the device list — your devices are all present and polling, not stuck in an error state.
- Fresh data is arriving. Open a device and confirm a graph is filling in with new readings taken since the upgrade finished.
- Alerting is on. Glance at the Alert Manager to confirm your alerts survived and are still enabled.
- The OS shows Debian 12. Back in System → System Settings, the System Upgrade card now reports
bookwormon PostgreSQL 15.
Once those look right, the upgrade is complete and you can reclaim the old database below.
Optional: reclaim the old database
The migration deliberately keeps your old PostgreSQL 13 database on the side as a fallback. Once you have signed back into Netmon and confirmed it is healthy on Debian 12, you can reclaim that disk space.
On the completion screen, click Reclaim old PostgreSQL 13 cluster and confirm. This removes the old copy for good. It is entirely optional — if you prefer to leave it in place for a while, the space it uses is modest and you can reclaim it later.
Removing the old database cannot be undone. Run the Confirm Netmon is healthy checks above first and satisfy yourself that your data is intact. Then reclaim.
You are done
That completes the upgrade. You can close the assistant tab and sign out. The appliance will keep updating the Netmon software automatically from here, as it always has — the next operating-system upgrade, whenever Debian’s next release calls for one, will follow this same assistant.
If something goes wrong
The upgrade is designed to fail safely: each step is checked, and the two points where things could go wrong both leave you with a clear way out.
Before the checkpoint: just stop
Anything up to the admin checkpoint is reversible. If the first stage reports a problem, or you simply change your mind, choose Stop and restore Netmon at the checkpoint. The assistant undoes its preparation and brings Netmon back up on Debian 11, exactly as before. Nothing is lost.
If a step fails
If a step fails outright, the assistant stops and shows a failure screen naming the step it stopped on. The appliance stays bootable.
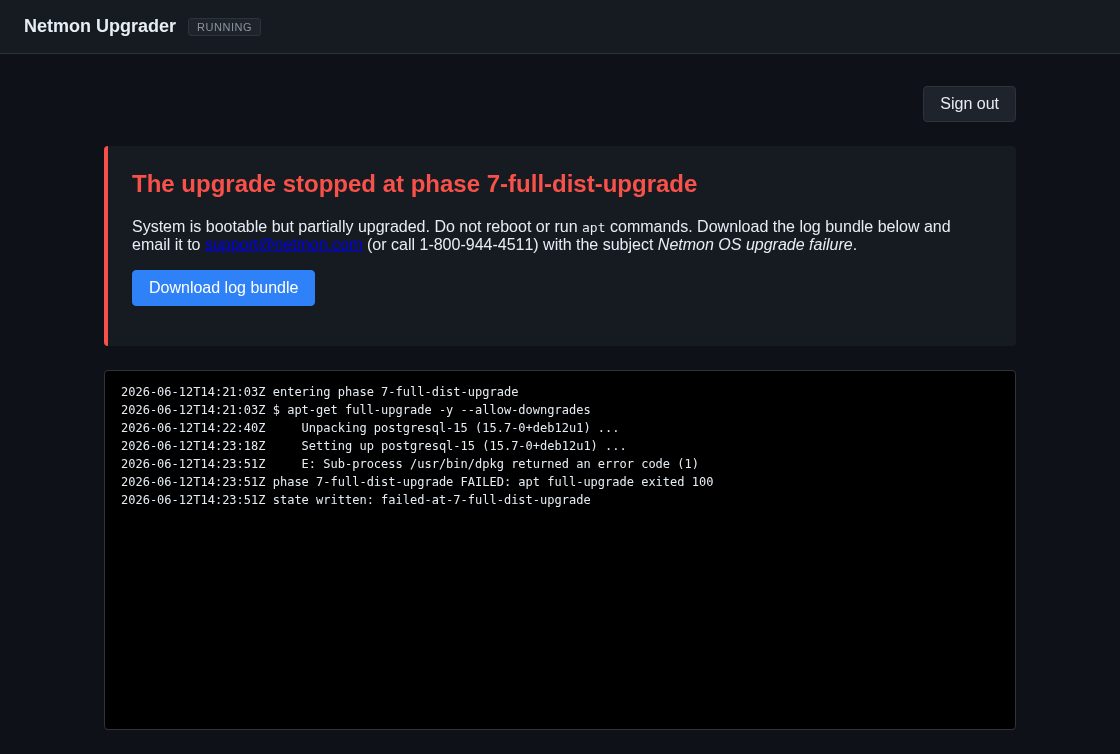
If you reach this screen:
- Do not reboot the appliance or run package commands by hand. The assistant has left the system in a known, recoverable state; manual changes make it harder to recover.
- Download the log bundle. Click the button on the screen to save it. The bundle contains the upgrade log and diagnostic details.
- Contact Netmon support. Send the log bundle to support@netmon.com (or call 1-800-944-4511), as the failure screen indicates, and we will tell you exactly how to proceed. Most failures come down to something simple, such as the appliance running low on disk part-way through, and are quickly resolved.
Rolling back with a restore
If you ever need to return the appliance to where it was, the same assistant restores from a backup. From its home screen, choose Restore Backup instead of OS Upgrade, pick the backup you took in Before you begin, and let it run. The restore takes its own safety snapshot first, replaces the database and configuration from your backup, and restarts Netmon. This is why the backup-and-key step at the start matters — it is what makes a clean rollback possible at any point.
Restoring is covered in more depth in the Product Guide under Data Maintenance.
If you lose the assistant tab
Keep the assistant open in one browser tab and you never touch the token again — it re-authenticates itself across both reboots. If you do close the tab or the browser while the upgrade is still running, the same one-time token remains valid until the upgrade finishes: re-open the assistant’s address and paste it in again. If you no longer have the token, read it from the appliance console with journalctl -u netmon-upgrader.